It's been mentioned several times that a tutorial would be helpful for those preparing images for the contests. This mini-tutorial covers changing the pixel size and file size of an image using IrfanView (
http://www.irfanview.com/). I'm using the latest version - v4.25. It's a bit late for the latest contest, although if you need to resize, voting hasn't started yet so if you ask JeffR nicely, he might let you update it.
Note that for the contests, the rules typically state the image should be no longer than 800 pixels on its longest side and less than 200 KB.
What some people might not realize is that photos from digital cameras are typically saved with some extra information (the EXIF data) that can be removed. This data just stores the camera type and settings (including lens settings), date, and other info. This info can take up a sizable chunk of the 200 KB. (For me, it takes up about 35 KB.) So, you'll want to save the image without this data in order to squeeze out a bit more quality.
So, here are the steps:
1. Process the images from the camera (cropping, white balance adjustments, colour corrections, conversion to b&w, sharpness adjustments, etc.) and save it to a jpg. Do not reduce the size and make sure you save it at 100% quality. This allows you a "master image" to work with.
2. Start IrfanView and load the jpg image.
3. Select Resize/Resample from the Image menu.

4. A dialog should appear. Make sure the check box next to "Preserve aspect ratio" is checked. Under "Set new size", change the longest dimension to 800. The other dimension will automatically adjust. Click OK when done.

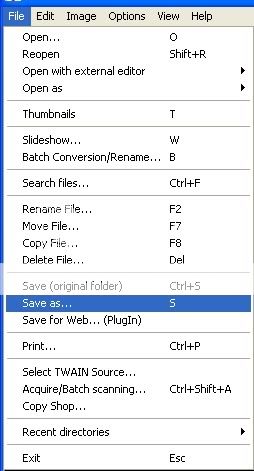
5. The image is now ready to save. I save the modified image in a new folder. Select Save As under the File menu.
6. At the bottom of the dialog that appears, select jpg format and make sure the "Show options dialog" check box is checked.

7. The options dialog should appear on screen and look something like the following:

These check box settings are what I use for my images.
8. Make sure the "Keep original EXIF data" check box is NOT checked.
9. Adjust the quality setting and save. Don't close IrfanView. Check the size of the file saved. If it is higher than 200 KB, go back to IrfanView and save it again using a slightly lower quality setting. Repeat the quality adjustments as needed until the saved image is below 200 KB.
Note that IrfanView works off of the original image loaded so if you save an image with a 90% quality setting, then go back and select save as with a 95% quality setting, the second image will be the originally loaded image at 95% quality, not the 90% quality image.
Hope this helps.


