Democratic Underground Latest Greatest Lobby Journals Search Options Help Login
Google

HELP --- I found a 14 x 16 inch pizza/baking stone today at the thrift

Printer-friendly format Printer-friendly format
Printer-friendly format Email this thread to a friend
Printer-friendly format Bookmark this thread
This topic is archived.
Home » Discuss » DU Groups » Home & Family » Cooking & Baking Group Donate to DU
 
NMDemDist2 Donating Member (1000+ posts) Send PM | Profile | Ignore Fri Feb-04-05 05:30 PM
Original message
HELP --- I found a 14 x 16 inch pizza/baking stone today at the thrift
store (and the peel- $4.98 for both :evilgrin: )

do I need to "season" it? it looks brand new

it's a light sandstone color with no stains or marks, had "KitchenAid" on the bottom

I am so jazzed!! but what (if anything) do I need to do before I use it?

also can anybody suggest a pizza dough recipe for my new mixer to try it out with? hehehehe

I have some sourdough bread mix/flour and some King Authur's All purpose in the pantry
Printer Friendly | Permalink |  | Top
Stinky The Clown Donating Member (1000+ posts) Send PM | Profile | Ignore Fri Feb-04-05 07:00 PM
Response to Original message
1. The stone needs nothing but love ... and dough
Nope, ya don't need to do anything. As you use it, you'll find it stains and discolors. This is completely normal. Don't wash it. Also, be careful of thermal shock. They've been known to crack. Put it in a cold oven about 30 minutes before you want to cook and let it heat with the oven. Preheating as long as an hour could be even better. These work by storing heat. And it takes time for the heat to get fully into the stone. You want your oven as hot as you can get it. If it goes to 750 degrees, that would be perfect!. But it doesn't. So just go as hot as you can.

Allow the stone to cool with your oven, too. Do NOT remove it hot. Let it get all the way to room temperature in your oven or you risk thermal shock just from the air or a cold surface you might put it on.

Also, keep in mind you need a peel. Actually, two peels are better. A wood one on which you make the pizza and from which you slide it onto the stone. You can use the same peel to get it out, but a metal peel is easier and better. As an alternative, use the wooden peel to make your pizza and to put it in the oven. Use tongs or a spatula to grip an edge of the pizza and just kinda slide it off the stone onto a pan or a plate.

And, when you make the pizza on the peel, put a fair amount of cornmeal on the peel before you plunk the dough on it This keeps the dough from sticking to the peel and allows it to "roll" off the peel onto the stone.

To clean the stone ..... just look at it! Don't clean it. If some cheese spills and gets on the stone, it will probably go all crusty before the stone is cool. When cool, it will probably lift off. If not, just scrape the big chunks off by ***gently*** using a metal spatula. At the end of the day, the temp in the oven and in the stone is so high that there's no bad stuff remaining and the food value for future bad stuff to grow is all gone, long ago turning to pure carbon. So just forget it. The stone will look messy, but its clean. NEVER wash it. (Think cast iron pan here).

Now .........

Here's a basic dough recipe that works for pizza:

1 C water at 115 degrees
1/4 t sugar
1 pkg active dry yeast

Mix together and allow to foam - maybe 10 minutes or so.

3 C (+/- 1/4 C) AP or Bread flour
1 tsp salt
1 EVOO

Put 2-3/4 C flour, the salt and the oil into your mixer with the dough hook attachment.

Add the yeast and water

Mix at a low speed (#2 (of the 10 available)(max) on a Kitchenaid) for approximately 10 minutes, or until the dough is smooth and stretchy. Add more flour of the dough is too sticky. It is unlikely the dough will need more water as the exact measure would have been 3 C and we used 1/4 C less to start. Scrape the bowl from time to time if needed.

Put the dough into a lightly oiled bowl and place in a warm, moist environment to proof until doubled. Wrap the dough's bowl in a towel to keep the dough moist. An ideal place for this is a warmer drawer with the setting all the way to "moist". The next best place is an oven that you preheat to its very lowest setting and then shut off and allow to cool back just a bit ... to maybe 90 degrees or so. I have also set the bowl on the cup warmer of my espresso machine! Whatever works.

When the dough rises, punch it down, divide it (this makes two 12-14" pizzas or four 8-10" pizzas). Round the divided dough and allow it to proof again, on a board, under a towel.

After the second proof, flatten the dough and shape it into pizzas. If at all possible, form it by hand, gently but persistently stretching it to the size you want, while keeping it generally round. As a last resort, use a rolling pin.

Lightly paint the top of the pizza shells with olive oil (keeps the dough from absorbing liquid and getting soggy. I use a paint brush for this. A paper towel will also do. Just keep the olive oil coating as thin as you can.

Add your toppings and bake. These will take between 3 and 6 minutes to cook, depending on your oven, the dough thickness, and the toppings. You want the edges to be golden or even darker and the bottom to be nice and golden.

Yer on yer own for toppings!

Have fun!
Printer Friendly | Permalink |  | Top
 
NMDemDist2 Donating Member (1000+ posts) Send PM | Profile | Ignore Fri Feb-04-05 07:21 PM
Response to Reply #1
2. TYVM!!! H2S you are the best! and I must tell you the story of today's
Edited on Fri Feb-04-05 07:52 PM by AZDemDist6
score

DH and I were thrifting (for a bread box, actually) and I saw the brand new (no stains or burnt bits) pizza peel in the "wood" section of trashy treasures

I picked it up and looked at DH and said "You know what this means?" he says "We're having pizza?"

"There is a baking stone around here somewhere, and I'm gonna go look for it" says I. sure enough, three rows over on the bottom shelf, shoved way back with a broiler pan sitting on top was a virgin KitchenAid baking stone.

I chortled all the way home LOL

edit to PS--- I have read you can make cookies on it too, should I still use a cookie sheet to protect the stone from the crisco/oil/butter? also I can use it to do crusty bread right? bake the bread right on the stone? parchment paper perhaps?

here's some of the cool scores from this week (and less than $30 all together :) ) i actually got 2 settings of the cobalt blue and 3 of the light blue that work well with my burgundy and peach plates


PSS... how much EVOO?? 1 what? cup, tsp, splash, bottle ?? lol
Printer Friendly | Permalink |  | Top
 
Stinky The Clown Donating Member (1000+ posts) Send PM | Profile | Ignore Fri Feb-04-05 09:01 PM
Response to Reply #2
3. "How much EVOO?"
Its a secret! If I tell you then I have to ........ LOL. I forget one little capital "T" and you're all over me!

I tablespoon (T) EVOO

Cookies ..... I guess you can. I've never done it, but then, I'm not a cookie kinda guy.

Bread ... yup! Takes some getting used to, but it works great for bread.

Nice scores from Thrifty! I like the dishes. You gonna set the table with mixed colors? I like that!
Printer Friendly | Permalink |  | Top
 
NMDemDist2 Donating Member (1000+ posts) Send PM | Profile | Ignore Fri Feb-04-05 09:14 PM
Response to Reply #3
4. yup, I have peach, burgundy, pink, teal and the two blues
and now I think I'm done LOL

i had a cream with black strip that worked well in my kitchen in Cal that was yellow with a black and white checker board floor.

It doesn't look right at all here with the southwest country chic I've got going on

:)
Printer Friendly | Permalink |  | Top
 
Tab Donating Member (1000+ posts) Send PM | Profile | Ignore Fri Feb-04-05 11:39 PM
Response to Original message
5. Worry not
I've been on a "pizza mastering" binge for years.

The stone is key - but more key is preheating your oven for an hour or more.

I have a high-end convection oven. It preheats literally in minutes.

Pizzas cooked in it after mere "pre-heating" sucked.

But a pizza stone on the bottom rack heated for one hour or more worked great. Actually I use a dual-stone approach - one on top and one on bottom. But the key is heating for an hour or more. Oven temp or no oven temp, just "pre-heating" won't get you there. Let it work for at least an hour at 450 degrees. 500 doesn't get you much further, except for maybe setting off your smoke alarm.

As for washing, you can wash the stone, despite what previous posts say, but the key is NO SOAP. Just use hot water. Soap screws up the stone. Take the stone out every once in a while with hot water and clean it; just don't muck it up with soap.
Printer Friendly | Permalink |  | Top
 
NMDemDist2 Donating Member (1000+ posts) Send PM | Profile | Ignore Sat Feb-05-05 12:54 AM
Response to Reply #5
6. excellent thanks! an hour at least huh? wow. n/t
Printer Friendly | Permalink |  | Top
 
Stinky The Clown Donating Member (1000+ posts) Send PM | Profile | Ignore Sat Feb-05-05 02:19 AM
Response to Original message
7. These are what I use for pizza stones
Edited on Sat Feb-05-05 02:27 AM by Husb2Sparkly


They're very thick and heavy. About 1-1/4" to 1-1/2" thick and weigh nearly 20 pounds each. If it appears that the oven racks are sagging a little ... they are!


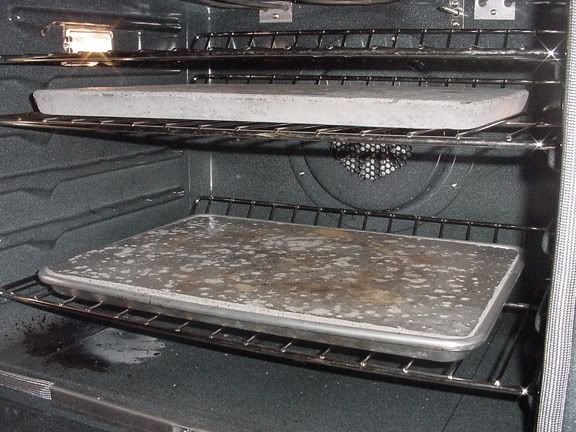
The one on the bottom is set into a half sheet pan. The one on the top is not. I use the one on the top on my gas grill in the summer to do outdoor pizza. Not the same as a brick oven, but with the lid closed I can get a good amount of heat.

These puppies are made of the same stuff as the hearths of the ovens made by these guys.

http://www.woodstone-corp.com/factory.htm

While their oven floors are a monolithic pour of some 3" to 6" of a special ceramic material, mine are much thinner. As they make their oven floors by hand, and since the pour must be made in one operation or the floor is scrap, they must make extra slurry in case some spills during the actual pour. They cast these little guys from that excess and give them away. I heard recently that they plan to start making these specifically, and with a better finish, and start selling them, but I don't know where you could buy one or what they would cost.

In operation, these need at least an hour to preheat, with an hour and a half or two hours being more usual for me. I use one on the oven bottom (But never on the oven floor - most will not tolerate a pan being directly on the floor and those instructions that came with yours, but which you've no doubt lost long ago, will specifically say that.) and one at the top. This is closer to what a true hearth oven is like inside ..... but not quite.

My old oven was a little faulty in a good way. It was hotter than the dial indicated. When set at 550 (its highest setting) it was closer to 625 inside. My new oven, sadly, won't do that. 500 is the highest it will go and my thermometer says it is just about right on that. The net result has been no change in the pizzas I get, but the cooking time is longer by a minute or two.

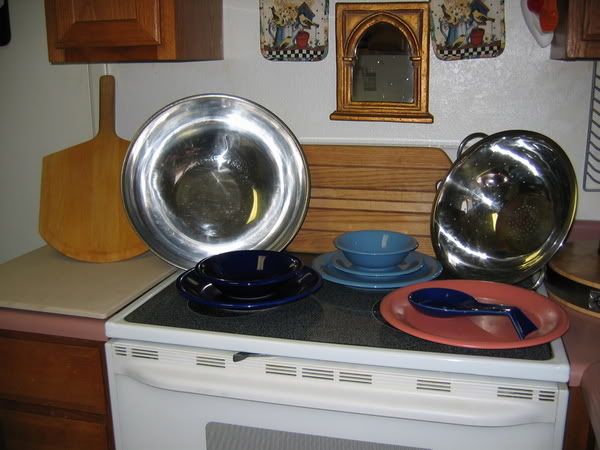
As you can see, these are all speckled and spotted (to say nothing of my oven floor! :)) I have never washed these, although unlike a more porous material, they could probably take it. In no case would soap ever be appropriate unless you like the taste of Palmolive Liquid!

I'll try to remember to take some pictures next time I decide to make pizzas. Funnily enough, I tend to make them more in the Summer than the winter. Go figure. :shrug:

Anyway, that stone of yours will give you great results. Once you do the usual pizza, try branching out a bit. here's a neat one that I do.

Cedar Plank Salmon

Buy a few cedar shims at the hardware store. The ones that are actually reject cedar shakes or cedar siding. You need them to be a few inches wide, not the little door stop sized ones.

Soak the cedar in hot water for an hour or three. While the cedar is soaking, clean a salmon fillet and cut it into portions that work for you. 4 to 6 ounces each is probably about right. Season the salmon as you wish (salt and pepper, at least) and then lay a sprig of rosemary (or even dill) and a few thin slices of lemon on top of it. Put each salmon portion on its own cedar "plank". Put a few stalks of asparagus on each side of the salmon and pop 'em on the baking stone.

The salmon will, of course, cook from the oven heat. But the stone will cause the cedar to quickly release the water and help to cook the salmon with a little steam. This also serves to keep the fish very moist. The cedar itself will impart a flavor to the fish, too .... a nice, woodsy kinda taste. Subtle, but for sure there. The top will brown on the edges that aren't covered by the lemon slices. Maybe 7 to 10 minutes later (depending on the actual temp of your oven and the potrtion size of the fish), its done!

Note: you want the cedar to feel damp, not be dripping wet, before you lay the fish on it.

By the way, I am told (but have no first hand experience) that Saltillo or quarry-type tile will work as an oven stone. Get one that is the right size or bigger, and as thick as possible, and cut to the size you need. If all you can find are small ones, just use two or four layed next to each other. It also needs to be an unglazed tile.
Printer Friendly | Permalink |  | Top
 
NMDemDist2 Donating Member (1000+ posts) Send PM | Profile | Ignore Sat Feb-05-05 04:35 AM
Response to Reply #7
8. mine looks like a big Saltillo tile
but the "KitchenAid" on the bottom was a giveaway LOL
Printer Friendly | Permalink |  | Top
 
DU AdBot (1000+ posts) Click to send private message to this author Click to view 
this author's profile Click to add 
this author to your buddy list Click to add 
this author to your Ignore list Wed May 08th 2024, 07:42 PM
Response to Original message
Advertisements [?]
 Top

Home » Discuss » DU Groups » Home & Family » Cooking & Baking Group Donate to DU

Powered by DCForum+ Version 1.1 Copyright 1997-2002 DCScripts.com
Software has been extensively modified by the DU administrators


Important Notices: By participating on this discussion board, visitors agree to abide by the rules outlined on our Rules page. Messages posted on the Democratic Underground Discussion Forums are the opinions of the individuals who post them, and do not necessarily represent the opinions of Democratic Underground, LLC.

Home  |  Discussion Forums  |  Journals |  Store  |  Donate

About DU  |  Contact Us  |  Privacy Policy

Got a message for Democratic Underground? Click here to send us a message.

© 2001 - 2011 Democratic Underground, LLC